Printers are notorious for sensing your fears. On Windows 11, people have often complained that they have been unable to add a printer, whether connected with a USB wire, a CAT5 (network) cable, or wirelessly.
Your personal or office printer is most likely connected to multiple computers so that it can be shared amongst them. Otherwise, each computer would need a separate printer – and that just doesn’t make sense. The printer can be connected with a USB cable to one computer and then shared, connected via an ethernet cable to the network, or wirelessly connected to the router/access point.
This article shows you all the possible ways to add a printer, both automatically and manually, to a Windows 11 PC.
An automatic printer connection is when the printer is automatically detected by the computer and then adding it becomes a straightforward task. While a manual addition of a printer is used when the printer is not being detected. In this case, you must manually add and configure the printer properties so that the print commands are sent and received successfully.
Quick Summary
Printer Connections
As mentioned earlier, a printer can be connected in multiple ways. This depends on what type of printer you have and its connectivity capabilities. If you are planning on buying a new printer, we suggest you glimpse into the future and look at the kind of setup you want.
A printer can be connected to a PC physically with a parallel or USB cable. It can also be connected with a CAT5/UTP cable directly to a computer or to the network. Additionally, it can be connected using wi-fi to the network, or connect using Wi-Fi Direct, if it supports it.

Most modern printers support multiple connection types.
How to Add a Printer to Windows 11 Automatically
Usually, most modern printers are self-detected by a Windows 11 computer if configured correctly. This means that they should be discoverable and connected to the computer or the same network as the computer. Only then would it have a chance to be discovered by the PC you are trying to add it to.
Use these steps to add a printer automatically to a Windows 11 computer:
-
Start by powering on and connecting the printer to your computer.
The printer can be connected by any one of the above-given connection types. If you are adding a printer wirelessly, then the printer needs to be connected to the same wi-fi as the computer.
-
On the Windows 11 computer, go to the following:
Settings app >> Bluetooth & devices >> Printers & scanners
-
Click “Add device.”

Add a new device Now, wait for your printer to be discovered.
-
When discovered, click “Add device” in front of it.

Add the discovered printer The settings app will now automatically add and install the printer to your device.
When the printer is added successfully, it will show “Ready” underneath it.
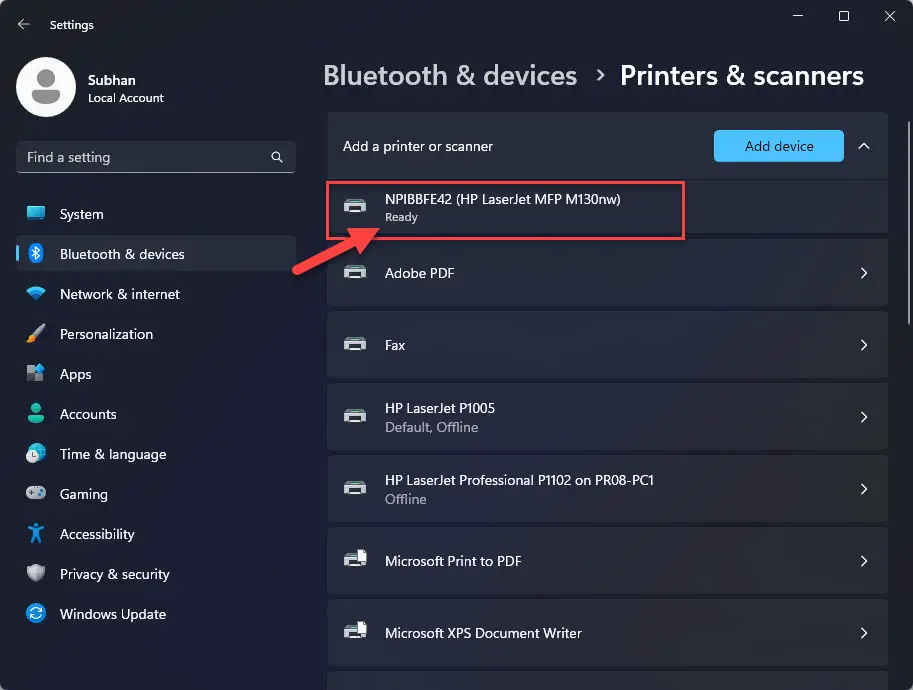
There can be times when a printer may not be detected. It is then when you add a printer using manual means.
How to Add a Printer to Windows 11 Manually
The methods to add a printer manually can differ depending on how it is connected to your PC or the PC’s network. It can be connected with a cable, wirelessly, or connected to another PC on your network (shared). We have discussed the different manual methods to add a printer to Windows 11 below.
Add Printer to Windows 11 with USB Connection
If your printer is physically connected to your computer with a USB or parallel cable, then use these steps to manually add it to your PC:
-
Make sure that the printer connection is secure with your computer.
-
Navigate to the following:
Settings app >> Bluetooth & devices >> Printers & scanners
-
Click “Add device.”

Add a new device Wait a few seconds for your PC to scan for devices.
-
Click “Add manually.”

Add printer manually The “Add printer” wizard will now open.
-
Select “Add a local printer or network printer with manual settings” and click Next.

Add a local printer -
Leave the default settings on the next screen and click Next.

Select printer port -
Now, select your printer’s brand and model from the driver list and click Next.

Select printer brand and model -
[Conditional] If asked to select the old or new driver, select “Use the driver that is currently installed” and click Next.

Select the current driver -
Set a name for the printer and click Next.

Name the printer -
Select “Do not share this printer” and click Next,

Don’t share the printer -
On the final page, click Finish.

Complete printer setup You can also choose “Print a test page” to make sure that the printer has been added successfully.
Add Printer to Windows 11 using IP Address
When a printer is connected to a network to be shared amongst a group, it will definitely have an IP address, which will likely be static. Regardless if it is connected to the network wirelessly or with a UTP cable, it will have an IP address.
You can thus add a printer using its IP address using these steps:
-
Navigate to the following:
Settings app >> Bluetooth & devices >> Printers & scanners
-
Click “Add device.”

Add a new device Wait a few seconds for your PC to scan for devices.
-
Click “Add manually.”

Add printer manually The “Add printer” wizard will now open.
-
Select “Add a printer using an IP address or hostname” and click Next.

-
Select the Device Type as “IPP Device,” enter the IP address of the printer, and click Next.
Note: If the printer’s IP address is not static, then we suggest that you use the printer’s hostname instead of the IP address.

Enter the IP address of the printer The wizard will now scan and add the printer.
-
On the final page, click Finish.

Close the wizard You can also choose “Print a test page” to make sure that the printer has been added successfully.
Add a Shared Printer to Windows 11
You can also add a printer that is connected to another computer with a cable. This is possible as long as the other computer is connected to the same network as yours.
Use these steps to add a shared printer in Windows 11:
Note: Make sure that the printer is shared over the network and is discoverable before performing these steps.
-
Navigate to the following:
Settings app >> Bluetooth & devices >> Printers & scanners
-
Click “Add device.”

Add a new device Wait a few seconds for your PC to scan for devices.
-
Click “Add manually.”

Add printer manually The “Add printer” wizard will now open.
-
Select “Select a shared printer by name,” enter the full name of the computer and the printer in the format given below, and click Next.
\\ComputerName\PrinterName

Add a shared printer -
Provide the login credentials for the remote computer to authenticate.

Enter credentials for remote computer The wizard will now scan and add the printer.
-
Set a name for the printer and click Next.

Name the printer -
On the final page, click Finish.

Complete printer setup You can also choose “Print a test page” to make sure that the printer has been added successfully.
Add Printer to Windows 11 with Wi-Fi Direct
You can also add a printer using Wi-Fi Direct, provided that your printer supports it. Use these steps to add a printer using Wi-Fi Direct:
-
Navigate to the following:
Settings app >> Bluetooth & devices >> Printers & scanners
-
Click “Add device.”

Add a new device Wait a few seconds for your PC to scan for devices.
-
Click “Show Wi-Fi Direct printers.”

View available Wi-Fi Direct printers Any printers in the surrounding with Wi-Fi direct enabled will now be displayed.
-
Click “Add device” in front of the printer with Wi-Fi Direct capabilities.

Add a printer with Wi-Fi Direct You will now be asked to enter a PIN for authentication, which will be displayed on the printer’s screen.
-
Enter the PIN and click Next.

Enter authentication PIN for Wi-Fi Direct connection The wizard will now scan and add the printer.
Closing Words
In older operating systems, like Windows 7 and 10, you could add a new device/printer using the Control Panel. However, in Windows 11, although the options are there in the Control Panel, you are diverted to the Settings app.
Therefore, the methods shared in this post to add printers both automatically, and manually, are the best and most convenient methods thus far.

